
Easy DIY Swimming Pool Fence Ideas
Key Takeaways
- Safety and Compliance: A pool fence is a must for safety, and knowing the local regulations ensures you’re covered.
- Material Options: Whether you’re into wood, metal, glass, or vinyl, each material brings its own perks and style to your pool area.
- DIY Advantages: Going the DIY route saves money, lets you customize the look, and gives you that “I did it!” feeling.
- Step-by-Step Guidance: I’ll walk you through the process, so you’re never left guessing what to do next.
- Design Inspiration: From rustic wood to modern glass, find a style that fits your pool vibe.
- Cost Management: Let’s talk about how to budget smartly so you get the best bang for your buck.
- Safety Features: Learn how to make sure your pool fence is safe, especially for the kiddos.
Introduction to DIY Swimming Pool Fences
Why am I so big on pool fencing? Well, it’s not just about checking off a safety box. It’s about making sure your pool area is a place where everyone can kick back and relax, worry-free. And if you ask me, taking the DIY route not only saves you money but also gives you the chance to put your personal stamp on the project. There’s something incredibly rewarding about being able to say, “Yeah, I built that.”
Importance of Pool Fencing
- Safety Benefits: For me, nothing beats the peace of mind that comes from knowing your pool area is safe. Pool fencing is a must if you want to keep kids and pets out of harm’s way. It’s that simple.
- Legal Requirements: In most places, pool fencing isn’t just a good idea—it’s the law. Knowing that you’re following the rules is one less thing to worry about.
- Aesthetic Value: Besides safety, a well-designed fence can really amp up the look of your outdoor space. It’s all about blending form and function to create something both safe and stylish.
Benefits of DIY Pool Fencing
- Cost-Effectiveness: I’m a big fan of DIY projects, mainly because they’re easier on the wallet. You’re cutting out the middleman, which means big savings on labor costs.
- Customization Options: The best part about DIY? You get to make it exactly how you want it. You choose the style, the materials, the color—everything. It’s your fence, your way.
- Sense of Accomplishment: There’s no better feeling than standing back and admiring something you built with your own hands. Every time you look at that fence, you’ll remember the effort and care you put into it.
Choosing the Right Materials for Your DIY Pool Fence
When it comes to picking materials, I’ve found that what works for one person might not be the best for another. Let’s break down the options and figure out what works best for you.
Wood
- Pros and Cons: Wood gives off that classic, natural vibe I’m a big fan of, but yeah, it does need a bit more TLC. If you enjoy a bit of weekend maintenance work like I do, wood might be your go-to.
- Best Types of Wood: From my experience, cedar and redwood are top-notch. They stand up well to moisture and pests, which is exactly what you want in a pool fence.
- Maintenance Tips: Staining or sealing your wood fence every year is a small price to pay for how good it looks. Set aside a weekend, and you’re golden.
Metal (Aluminum, Steel, Wrought Iron)
- Durability and Strength: If durability is what you’re after, metal’s where it’s at. I appreciate the solid, secure feeling a metal fence provides.
- Design Flexibility: Metal fences can be super versatile. Whether you’re going for sleek and modern or something with a bit more flair, there’s a metal style out there for you.
- Rust Prevention and Maintenance: I’ve dealt with rusty fences before, and it’s not fun. Thankfully, aluminum’s rust-proof, and a good protective coating can keep steel or wrought iron looking sharp.
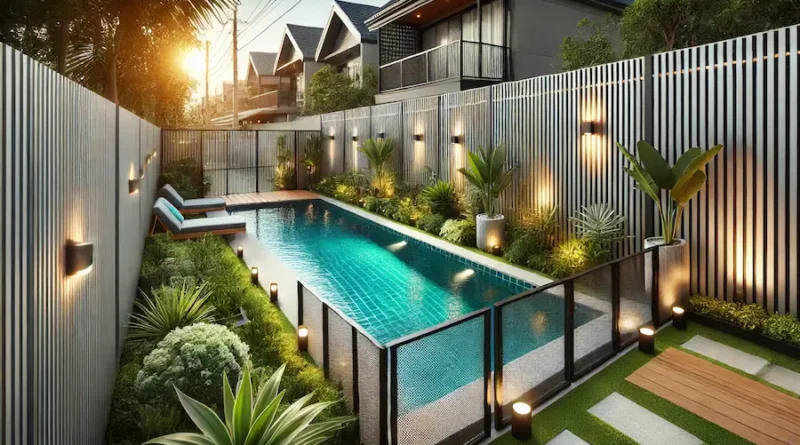
Glass
- Modern and Stylish Appeal: If you want your pool to be the star of the show, a glass fence is where it’s at. I love how it creates a barrier without blocking the view.
- Safety Considerations: Tempered glass is strong stuff, so you don’t have to worry about it shattering. It’s safe and stylish, though keeping it clean is another story.
- Cleaning and Maintenance Tips: Glass fences look amazing when they’re clean. I’ve found that a simple mix of water and vinegar works wonders.
Vinyl
- Weather Resistance: Vinyl is your friend if you’re not into high-maintenance. It handles the weather like a champ, so you can spend less time on upkeep.
- Color Options and Customization: Vinyl offers a lot of flexibility with colors and styles. It’s great if you want something that matches your home’s exterior without too much hassle.
- Longevity and Care: Just give it a good wash every now and then, and your vinyl fence will keep looking good. It’s the no-fuss option that still delivers on style.
Essential Tools and Equipment for DIY Pool Fence Installation
Having the right tools makes all the difference. I’ve learned that investing in good tools not only makes the job easier but also a lot more enjoyable.
Measuring Tools
- Tape Measure: Accurate measurements are crucial—this isn’t something you want to eyeball. A reliable tape measure is a must.
- Laser Level: For me, a laser level is a game-changer. It ensures everything is perfectly straight, which is key for a professional-looking result.
- Marking Tools: Marking your spots before you start drilling or digging can save a lot of headaches down the line. I like to use chalk because it’s easy to adjust if needed.
Cutting and Drilling Tools
- Saws: Whether you’re working with wood or metal, having the right saw is essential. Personally, I prefer a miter saw for precision cuts, but a circular saw is also great for longer, straight cuts.
- Drills and Drill Bits: A good drill is worth its weight in gold when it comes to fence installation. Make sure you’ve got a variety of drill bits on hand.
- Sanding Tools: Smoothing out rough edges is key to preventing injuries and ensuring a polished finish. A power sander can make quick work of this.
Installation Tools
- Post Hole Diggers or Augers: Digging post holes can be a workout, but with the right tool, it’s manageable. I’ve found that an auger makes the job easier and quicker.
- Concrete Mixer or Quick-Set Concrete: Securing the posts in concrete is non-negotiable for a sturdy fence. I like using quick-set concrete for its convenience.
- Screws, Bolts, and Brackets: These small items are easy to overlook, but they’re what hold everything together. Make sure to have extras on hand just in case.
Step-by-Step Guide to Building a DIY Pool Fence
I’m not going to sugarcoat it—installing a pool fence takes some effort, but if you follow these steps, you’ll be just fine.
Planning and Layout
- Mapping the Area: Before you dive in, it’s important to have a clear plan. I like to walk around the pool area, envisioning where the fence will go, and marking it out.
- Measuring the Perimeter: Accurate measurements here will save you a ton of frustration later. Measure twice, cut once—that’s the rule I live by.
- Marking Post Locations: Marking where your posts will go ensures you don’t end up with uneven spacing or awkward gaps. I’ve found that using stakes and string works well to map out a straight line.
Preparing the Ground
- Clearing Debris: Before you start digging, make sure the area is clear of any obstacles. A clean workspace is a safe workspace.
- Leveling the Ground: I can’t stress enough how important this step is. A level ground will prevent a lot of issues down the road, like leaning posts or uneven panels.
- Digging Post Holes: When it comes to digging post holes, depth matters. I always go at least a third of the post’s length deep for stability.
Installing Fence Posts
- Positioning the Posts: Take your time with this step. It’s better to get it right now than to try and fix it later. I always use a level to ensure the posts are perfectly straight.
- Securing with Concrete: Once your posts are in place, securing them with concrete is the way to go. I like to let the concrete set overnight to ensure everything is solid.
- Ensuring Alignment and Stability: Before the concrete fully hardens, double-check that your posts are still aligned. This is your last chance to make adjustments.
Attaching Fence Panels
- Cutting Panels to Size: Depending on your layout, you might need to cut some panels to fit. Measure carefully and cut precisely to avoid any gaps.
- Attaching Panels to Posts: This is where things start to come together. Secure the panels to the posts using screws or bolts, making sure everything is tight and aligned.
- Ensuring Even Spacing: Getting the spacing just right is what’ll make your fence look pro. I use a spacer block to keep things consistent.
Adding Gates and Locks
- Installing the Gate Frame: Your gate is going to get a lot of use, so make sure it’s installed securely. I always check that it swings smoothly before moving on.
- Attaching Hinges and Locks: A strong, reliable lock is essential, especially if you’ve got kids around. I usually go for a self-closing hinge for added safety.
- Safety Mechanisms for Child-Proofing: Adding a childproof latch is a small step that makes a big difference in safety. It’s one of those features you’ll be glad you included.
DIY Pool Fence Ideas by Design Style
I love how a pool fence can be both functional and stylish. Here are some of my favorite design ideas.
Rustic Wood Fence
- Natural Look with Untreated Wood: If you’re going for a natural, rustic vibe, untreated wood is a great choice. It ages beautifully and adds a warm, organic feel to your pool area.
- Staining and Finishing Options: I prefer a light stain that enhances the wood grain while protecting it from the elements. It’s a simple step that adds longevity to your fence.
Sleek Glass Fence
- Frameless Glass Panels: For a modern, unobtrusive look, frameless glass panels are the way to go. I’m a big fan of how they keep the focus on the pool while providing safety.
- Frosted vs. Clear Glass: Frosted glass offers more privacy, while clear glass keeps the view open. Personally, I lean towards clear glass for that seamless look.
Decorative Metal Fence
- Intricate Designs and Patterns: If you want to add some personality to your fence, decorative metal is a fantastic option. I’ve always appreciated the craftsmanship that goes into intricate designs.
- Powder-Coated Finishes for Color: Powder coating adds color and protects the metal from rust. It’s a durable option that gives you a lot of flexibility in terms of style.
Modern Vinyl Fence
- Clean Lines and Minimalist Design: Vinyl fences are perfect for a clean, minimalist look. I like how they provide a solid barrier without overwhelming the space.
- White and Other Color Options: White is a classic choice, but vinyl comes in a variety of colors. I recommend choosing a color that complements your home’s exterior for a cohesive look.
Safety Considerations for DIY Pool Fences
When it comes to pool safety, I’m a stickler for details. Here’s how to ensure your fence meets all the necessary standards.
Meeting Local Safety Codes
- Understanding Height and Gate Requirements: Before you start, check your local safety codes. These regulations are there for a reason, and following them ensures your fence is up to standard.
- Spacing and Gap Regulations: Make sure there are no gaps large enough for a child to squeeze through. This is a non-negotiable aspect of pool safety.
Childproofing Your Fence
- Self-Closing Gates: A self-closing gate is a simple addition that can make a big difference in safety. It’s one of those things you’ll be glad you included, especially if you have young children.
- Latches and Locks: I recommend a childproof latch that’s out of reach of little hands. It’s a small detail that significantly enhances safety.
- Anti-Climb Features: To prevent climbing, consider a fence design with vertical bars or smooth surfaces. It’s an easy way to add an extra layer of protection.
Regular Maintenance for Safety
- Inspecting for Wear and Tear: Regular inspections are key to ensuring your fence remains safe and secure. I make it a habit to check for any loose panels or signs of wear at the start of each season.
- Reinforcing Weak Points: If you spot any weak points, reinforce them immediately. It’s much easier to fix a small issue before it becomes a big problem.
- Seasonal Maintenance Tasks: A little seasonal maintenance goes a long way. Cleaning, inspecting, and repairing your fence as needed will keep it in top shape.
Cost Estimation and Budgeting for a DIY Pool Fence
Budgeting for your pool fence doesn’t have to be stressful. Here’s how I approach it.
Material Costs
- Price Comparison of Different Materials: It pays to shop around. Compare prices for wood, metal, glass, and vinyl to find the best deal. I’ve found that sometimes the best price isn’t just about the lowest cost, but the best value for the quality.
- Estimating the Amount Needed: Measure twice, buy once. Accurate measurements will help you avoid buying too much or too little material.
Tool and Equipment Costs
- Renting vs. Buying Tools: If you don’t already have the necessary tools, consider renting instead of buying. This can save money, especially if you’re not planning to use the tools regularly.
- Estimated Expenses: Create a budget that includes all potential costs—materials, tools, and any unexpected expenses. I always add a little extra to cover surprises.
Labor Costs
- Saving Money with DIY: Doing it yourself is a great way to save money. But don’t forget to factor in your time. This isn’t just a cost in dollars—it’s a commitment of your weekends and evenings.
- Time Commitment Considerations: Be realistic about how much time you can devote to the project. Breaking the project into manageable chunks can make it more doable.
Tips for a Successful DIY Pool Fence Project
Here are a few tips I’ve picked up over the years to help ensure your project goes smoothly.
Common Mistakes to Avoid
- Poor Measurements: It’s tempting to eyeball things, but trust me, accurate measurements are essential. It’s worth taking the time to do it right the first time.
- Ignoring Local Codes: Safety codes are there for a reason. Make sure you know and follow them to avoid costly fines or having to redo your work.
- Using Incorrect Materials: Not all materials are created equal. Choose ones that are specifically designed for outdoor use and can withstand the elements.
Time Management
- Planning Work Sessions: Break the project into stages and tackle each one separately. This makes the overall task less overwhelming and helps keep you on track.
- Avoiding Delays: Plan for potential delays, like weather or supply shortages. Being flexible with your timeline can help keep things moving smoothly.
Getting Help When Needed
- When to Consult a Professional: If you’re unsure about any aspect of the project, don’t hesitate to get professional advice. It’s better to ask for help than to make a mistake that could have been avoided.
- Safety Tips for DIY Projects: Always prioritize safety. Wear protective gear, work in a well-ventilated area, and take your time. Rushing can lead to mistakes or injuries.
Case Studies of Successful DIY Pool Fence Projects
I’ve seen firsthand how rewarding a DIY pool fence project can be. Here are a couple of examples.
Case Study 1: Wooden Pool Fence
- Project Overview: A homeowner builds a cedar wood fence around their backyard pool. The rustic look perfectly complements their garden, creating a cohesive outdoor space.
- Challenges Faced: They had to deal with uneven ground, which made it challenging to get the posts perfectly level. But with some patience and a little extra digging, they got the job done.
- Final Outcome: The result was a beautiful, natural-looking fence that blends seamlessly with the surrounding landscape. The homeowners were thrilled with how it turned out and proud of their work.
Case Study 2: Glass Pool Fence
- Project Overview: A sleek, frameless glass fence was installed by a DIY enthusiast around a modern pool. They wanted something that wouldn’t obstruct the view of their beautifully landscaped yard.
- Challenges Faced: Handling large glass panels was tricky, especially when it came to aligning them perfectly. With careful planning and some extra hands to help, they managed to install the panels securely.
- Final Outcome: The finished fence is stunning—almost invisible, it allows the pool and landscaping to take center stage. It’s the perfect blend of safety and style.
Conclusion
Recap of Key Points
Building a pool fence isn’t just about following the rules—it’s about making sure your backyard is a safe, beautiful spot where everyone can have a good time. Whether you go with wood, metal, glass, or vinyl, taking the DIY route means you can customize your fence to fit your style and needs perfectly. Following these steps will help make sure your project turns out just the way you want it.
Encouragement to Start Your Project
Don’t let the thought of building a pool fence freak you out. With the right tools, materials, and a bit of patience, you can create something that not only keeps your loved ones safe but also adds a personal touch to your outdoor space. Trust me, the sense of accomplishment you’ll feel at the end is worth every bit of effort.
Frequently Asked Questions (FAQs)
What is the best material for a DIY pool fence?
The best material depends on your priorities. Wood is great for a natural look, metal for durability, glass for modern aesthetics, and vinyl for low maintenance.
How high should a pool fence be?
Most local codes require pool fences to be at least 4 to 5 feet high, but check your local regulations for specific requirements.
Can I install a pool fence myself?
Yes, with the right tools and materials, installing a pool fence can be a manageable DIY project, especially with detailed planning and preparation.
What tools do I need for a DIY pool fence?
Essential tools include a tape measure, saws, drills, post hole diggers, and a concrete mixer or quick-set concrete.
How do I childproof my pool fence?
Make sure the gate closes on its own and has a latch high enough so the little ones can’t reach it. Consider anti-climb designs and regularly inspect the fence for safety.